22 Mar Before & After Edit – Hobart Newborn Photographer
Gorgeous baby Ryan visited the studio yesterday and I was dying to use this blue wooden box that I purchased a few weeks ago from Wood & Lace Photography Props. I have used it previously with an older sitting baby but not yet a newborn.
I thought this would be a great opportunity to give you an insight into what happens after a photo has been taken and what kind of things I look for in the post processing stage.
Firstly, I use Photoshop CC to edit my images which I photograph in RAW format to give me the most control in editing.
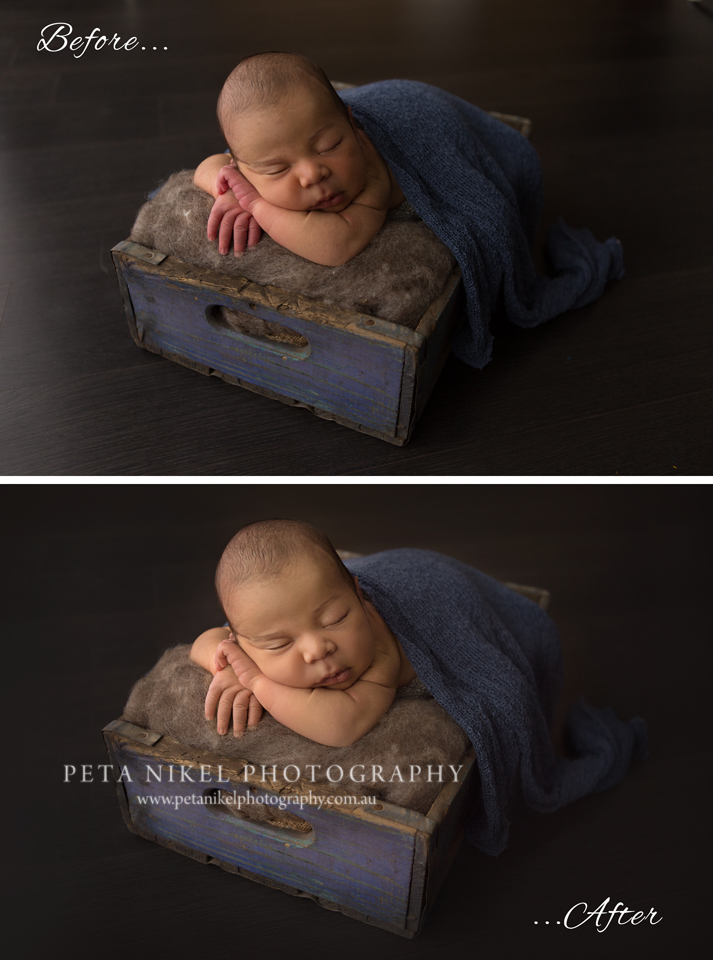
The single most important thing is to try and get as much right in camera to begin with to save you time editing. As you can see from the image below, I did shoot it a little dark which can be advantage as I have no blown out highlights, but I do have some distracting things in the background of the image also.
To give you a quick run down here are some of the things I did to get my final result;
- Firstly a crop was needed to bring the image in closer and remove some of the distracting background. What I couldn’t remove with the crop, I have removed with a mixture of various methods including the patch tool and clone tool.
- I lightened the side of Ryan’s face which was a little too much in shadow. I also reduced the red in his skin using selective colour. Baby’s hands and feet are often quite red. Some people choose to keep them that way. I like to match them better to the rest of the baby’s skin.
- I removed any little skin blemishes and softened Ryan’s skin just slightly. Nobody wants to see an over smoothed baby with no texture in his skin so I am careful not to overdo this step. I used a clarify action to bring out some detail in his eyelashes and lips.
- I smoothed out my dark flooring background my selecting a colour from the floor and brushing it at low opacity over the entire image.
- I ran warming action over the entire image and reduced the opacity to taste.
- I then boosted the contrast in Ryan’s face/skin with a curves layer. Sometimes actions can make baby’s skin look a little flat which is why I have included this step in my workflow.
- I finished with a vignette on the outer edge of the image which I like to do especially if an image has a darker background.
I am mostly self taught in photoshop but have learnt things along the way from other photographers and workshops. My biggest editing inspiration is Kelly Brown as I think she is the master of taking a photograph and turning it into a piece of art. This image is a prime example.
I hope you’ve enjoyed this post or if you are a photographer, I hope you got something out of it. Let me know in the comments below.
If you’d like to book your very own custom newborn session with Peta Nikel Photography, please contact Peta today to request pricing information.


No Comments